
Table of Contents
Introduction
Have you ever wondered why your aquarium water turns cloudy even with a brand-new filter?
A proper aquarium filter setup is one of the most important steps in creating a healthy and stable aquarium. It keeps the water clean, removes harmful waste, and supports beneficial bacteria that help your fish thrive. Yet many beginners accidentally install filters incorrectly, choose the wrong filter size, or skip essential setup steps that can affect water quality.
The good news is that setting up an aquarium filter is easier than it seems when you follow the right process. Whether you’re learning how to setup aquarium filter for your first freshwater tank or planning a canister aquarium filter setup, this guide has you covered.
In this complete guide, you’ll learn how different aquarium filters work, how to install them correctly, choose the right filter for your tank, avoid common beginner mistakes, and maintain your filter for long-term performance. By the end, you’ll have the confidence to keep your aquarium clean, healthy, and running smoothly.
What Does an Aquarium Filter Do?
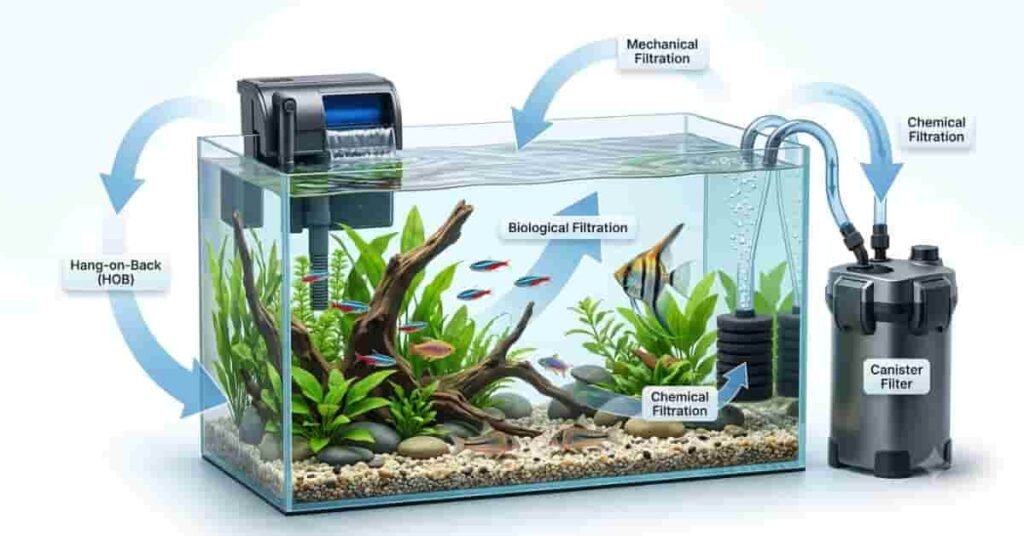
An aquarium filter is the heart of your tank. It keeps the water clean, supports healthy bacteria, and creates a safer environment for your fish. A proper aquarium filter setup does much more than remove visible debris. It also helps maintain stable water conditions and reduces harmful waste that can stress or harm aquatic life.
For larger aquariums, a sump can provide additional space for filtration and equipment while keeping the display tank cleaner. Learn more in our Aquarium Sump Setup Guide.
Most aquarium filters use three types of filtration. Each one has a different job, but they work together to keep your aquarium balanced. Understanding these filtration stages makes it easier to choose the right filter and maintain it correctly.
A common beginner mistake is thinking clear water always means clean water. Water can look crystal clear while still containing harmful ammonia or nitrite. That’s why every stage of filtration plays an important role in keeping your aquarium healthy.
Mechanical Filtration
Mechanical filtration is the first line of defense against dirt and debris. It traps uneaten food, fish waste, dead plant material, and other floating particles before they spread through the tank.
Most filters use a sponge, filter floss, or foam pad for this stage. These materials should be cleaned regularly with old aquarium water. Avoid rinsing them under tap water because chlorine can damage beneficial bacteria living on the media.
Pro Tip: Clean mechanical media only when water flow slows down. Over-cleaning can reduce your filter’s efficiency.
Biological Filtration
Biological filtration is the most important part of a healthy aquarium. It provides a home for beneficial bacteria that naturally break down toxic fish waste.
These bacteria convert harmful ammonia into nitrite and then into the less harmful nitrate through the nitrogen cycle. Ceramic rings, bio balls, and sponge media offer large surfaces where these bacteria can grow and thrive.
Expert Tip: Never replace all biological media at the same time. Keeping some mature media helps protect your beneficial bacteria colony and prevents sudden water quality problems.
Chemical Filtration
Chemical filtration removes dissolved impurities that mechanical filtration cannot catch. It can improve water clarity, reduce odors, and remove certain chemicals from the aquarium.
Activated carbon is the most common chemical filter media. It is useful for removing medication after treatment, reducing discoloration, and eliminating unwanted odors. However, it is optional for many freshwater aquariums and should be replaced according to the manufacturer’s recommendations.
Use chemical filtration only when it provides a clear benefit. A well-maintained aquarium often relies mainly on mechanical and biological filtration.
| Filtration Type | Main Purpose | Common Media | Should It Always Be Used? |
|---|---|---|---|
| Mechanical | Removes debris and solid waste | Sponge, filter floss, foam | Yes |
| Biological | Breaks down harmful ammonia and nitrite | Ceramic rings, bio balls, sponge | Yes |
| Chemical | Removes dissolved impurities and odors | Activated carbon, specialty resins | Optional |
Types of Aquarium Filters
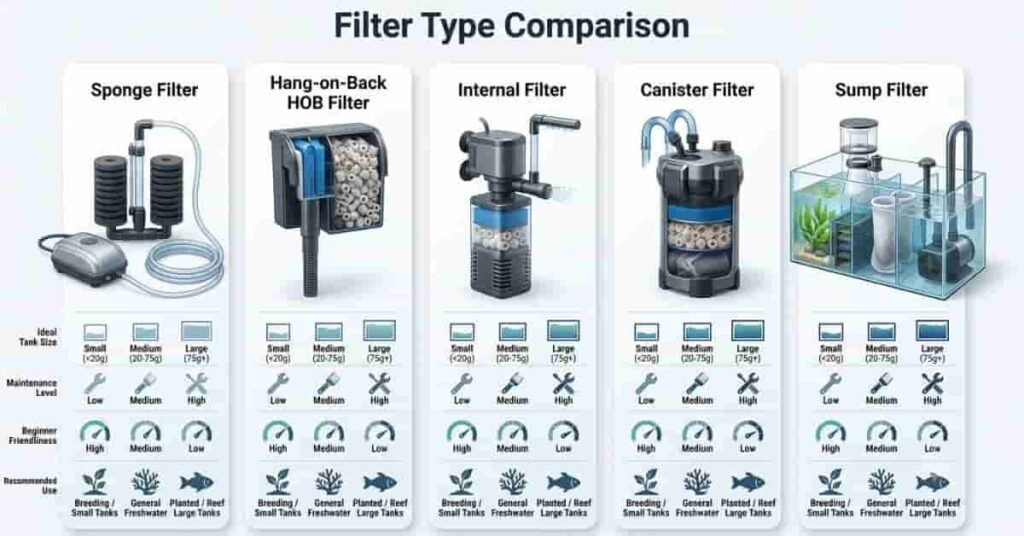
Choosing the right filter is just as important as setting it up correctly. Each filter type has different strengths, making it better suited for certain tank sizes, fish species, and maintenance routines. Understanding these options will help you build an effective aquarium filter setup that keeps your aquarium clean and healthy.
Some filters are ideal for beginners because they are simple to install and maintain. Others offer powerful filtration for larger aquariums but require more space and regular care. The best choice depends on your tank size, fish load, budget, and long-term goals.
Good filtration is also essential for maintaining healthy planted tanks and stable water conditions. If you’re setting up a planted tank, check out our Planted Aquarium Setup Guide for a complete beginner-friendly walkthrough.
Sponge Filter
A sponge filter is one of the easiest and most affordable options for beginners. It uses an air pump to pull water through a sponge, trapping debris while providing a large surface for beneficial bacteria.
Sponge filters work best in small freshwater aquariums, breeding tanks, shrimp tanks, and betta aquariums. They create gentle water flow, making them safe for delicate fish and fry.
Pro Tip: Choose a sponge filter slightly larger than your tank’s minimum requirement for better biological filtration.
Hang-on-Back (HOB) Filter
A Hang-on-Back (HOB) filter hangs on the back of the aquarium and is one of the most popular choices for home aquariums. It combines mechanical, biological, and optional chemical filtration in one compact unit.
HOB filters are easy to install, simple to clean, and available in many sizes. They work well for most freshwater community tanks and provide good water circulation without taking up space inside the aquarium.
Pro Tip: Keep the water level close to the filter outlet to reduce splashing and operating noise.
Internal Filter
An internal filter sits inside the aquarium and stays fully submerged. It pulls water through filter media before returning clean water to the tank.
These filters are suitable for small to medium aquariums, quarantine tanks, and temporary setups. They are compact and easy to maintain but take up some swimming space inside the aquarium.
Pro Tip: Position the filter near one end of the tank to improve water circulation throughout the aquarium.
Canister Filter
A canister filter is a powerful external filtration system designed for medium to large aquariums. It holds several layers of filter media, providing excellent mechanical, biological, and chemical filtration.
Although a canister aquarium filter setup takes more time than other filters, it offers outstanding water quality and quieter operation. It is an excellent choice for heavily stocked tanks, planted aquariums, and larger freshwater or saltwater systems.
Expert Tip: Label the intake and output hoses before maintenance to make reassembly faster and avoid connection mistakes.
Sump Filter
A sump filter is an external filtration system usually placed beneath the aquarium. Water flows into the sump through an overflow, passes through multiple filter chambers, and returns to the tank with a pump.
Sump filters offer the highest filtration capacity and make it easy to add equipment such as heaters, protein skimmers, or reactors. They are commonly used in large freshwater displays and most saltwater reef aquariums.
Pro Tip: Leave extra space in the sump to handle water that drains during a power outage.
Aquarium Filter Comparison
| Filter Type | Best Use | Recommended Tank Size | Maintenance | Beginner-Friendly |
|---|---|---|---|---|
| Sponge Filter | Shrimp tanks, bettas, fry, breeding tanks | Up to 20 gallons | Easy | ⭐⭐⭐⭐⭐ |
| Hang-on-Back (HOB) | Community freshwater aquariums | 10–75 gallons | Easy | ⭐⭐⭐⭐⭐ |
| Internal Filter | Small aquariums and quarantine tanks | 5–40 gallons | Easy | ⭐⭐⭐⭐☆ |
| Canister Filter | Large, planted, or heavily stocked aquariums | 30+ gallons | Moderate | ⭐⭐⭐☆☆ |
| Sump Filter | Large freshwater and reef aquariums | 75+ gallons | Advanced | ⭐⭐☆☆☆ |
Choosing the Right Aquarium Filter
The best aquarium filter isn’t always the biggest or most expensive one. It should match your tank’s size, fish, and maintenance needs. Choosing the right filter from the start makes your aquarium filter setup more effective and helps prevent water quality problems.
Saltwater aquariums have additional filtration and equipment requirements compared with freshwater tanks. Our Saltwater Aquarium Setup Guide explains how to build and start a beginner-friendly marine system.
Tank Size
Always choose a filter rated for your aquarium’s size. A filter that’s too small may struggle to remove waste, while an oversized filter can create strong water flow for small fish.
As a general rule, select a filter that can circulate the entire tank volume several times per hour. Check the manufacturer’s recommended tank size before buying.
Freshwater vs. Saltwater
Most filters work well for freshwater aquariums. Saltwater tanks often need stronger filtration because they contain more equipment and produce different types of waste.
Many reef aquariums use canister filters or sump systems alongside protein skimmers for better water quality.
Fish Load
Think about how many fish your aquarium will hold. A lightly stocked community tank needs less filtration than a heavily stocked cichlid or goldfish aquarium.
If you plan to keep messy fish or add more fish later, choose a filter with extra capacity. Slightly over-filtering is usually better than under-filtering.
Planted Aquarium
Planted aquariums need good water circulation without creating excessive current. Too much flow can damage delicate plants and stress certain fish.
Sponge filters and adjustable Hang-on-Back (HOB) filters are popular choices for planted freshwater tanks because they provide gentle, even circulation.
Budget
Aquarium filters come in a wide range of prices. A higher price doesn’t always mean better performance for your aquarium.
- Sponge filters: Affordable and ideal for small tanks.
- HOB filters: Great balance of price, performance, and maintenance.
- Canister filters: Higher upfront cost with excellent filtration for larger aquariums.
- Sump filters: Best for advanced setups but require the biggest investment.
Filter Selection Guide
| Aquarium Type | Recommended Filter |
|---|---|
| Betta or shrimp tank | Sponge Filter |
| Small freshwater aquarium (5–20 gal) | Sponge or HOB Filter |
| Community aquarium (20–55 gal) | HOB Filter |
| Large freshwater aquarium (55+ gal) | Canister Filter |
| Reef or large saltwater aquarium | Sump Filter |
Equipment Needed Before Filter Setup
Preparing everything before you begin makes the installation process faster and easier. Having the right equipment also reduces mistakes that could affect your aquarium’s water quality. Before starting your aquarium filter setup, gather all the essential supplies and check that each item is working properly.
The exact equipment depends on your filter type, but most freshwater aquariums use the same basic items.
Aquarium Filter
Choose a filter that matches your aquarium size and livestock. Make sure all parts are included before installation.
Filter Media
Most filters include mechanical and biological media. Some also use activated carbon or other chemical media. Install each type in the correct order if your filter requires multiple layers.
Air Pump (For Sponge Filters)
Sponge filters need an air pump to move water through the sponge. Select an air pump that provides enough airflow for your aquarium size.
Airline Tubing
Airline tubing connects the air pump to the sponge filter. Check that the tubing fits securely without leaks or sharp bends.
Water Conditioner
Always treat tap water with a quality water conditioner before filling the aquarium. This removes chlorine and chloramine, which can harm fish and beneficial bacteria.
Reliable Power Source
Place the filter near a grounded electrical outlet. Create a drip loop in the power cord to prevent water from reaching the outlet.
Pre-Setup Checklist
| Item | Ready? |
|---|---|
| Aquarium filter | ☐ |
| Filter media installed | ☐ |
| Air pump (if needed) | ☐ |
| Airline tubing | ☐ |
| Water conditioner | ☐ |
| Power outlet nearby | ☐ |
| Aquarium filled with conditioned water | ☐ |
| Manufacturer’s instructions | ☐ |
Key Takeaways
- Gather all equipment before installing the filter.
- Use conditioned water to protect fish and beneficial bacteria.
- Sponge filters require an air pump and airline tubing.
- Double-check every connection before turning the filter on.
- A simple checklist helps prevent common beginner mistakes.
How to Set Up an Aquarium Filter (Step-by-Step)
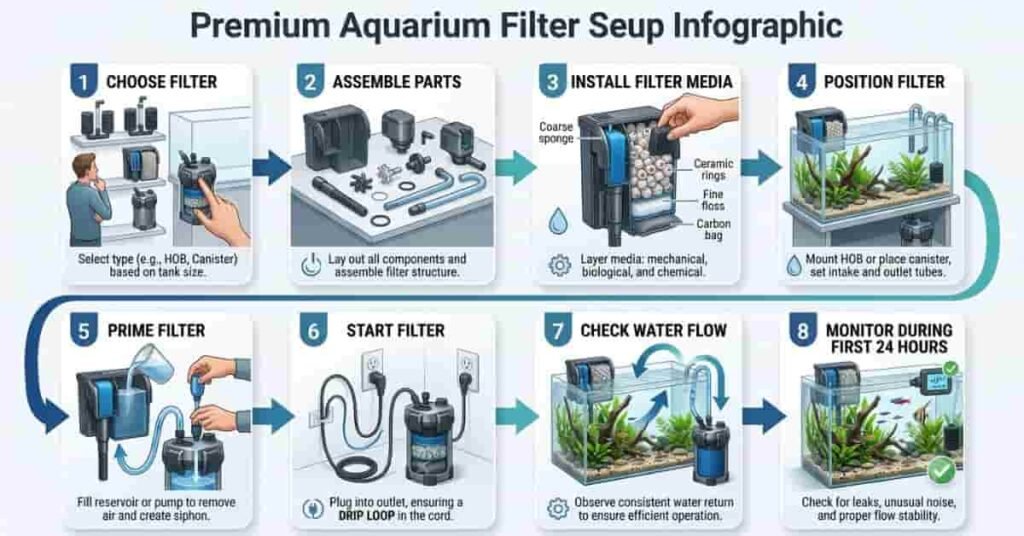
A proper aquarium filter setup only takes a few minutes, but it has a lasting impact on your aquarium’s health. Following the correct steps helps prevent leaks, protects beneficial bacteria, and keeps your filter running efficiently from day one. If you’re wondering how to setup aquarium filter correctly, this beginner-friendly guide will walk you through the entire process.
Step 1 – Choose the Correct Filter
Select a filter designed for your aquarium’s size and livestock. Check the manufacturer’s recommended tank capacity and flow rate before purchasing.
For example, a sponge filter works well for small shrimp or betta tanks, while a canister filter is better for larger aquariums with heavier fish loads.
Step 2 – Assemble the Filter
Unpack all filter components and compare them with the instruction manual. Attach any required parts, such as intake tubes, spray bars, or impellers, before installation.
Avoid forcing pieces together. Most parts should fit securely without excessive pressure.
Step 3 – Install Filter Media
Place the filter media in the correct order if your filter uses multiple layers.
A common arrangement is:
- Mechanical media (sponge or filter floss) first
- Biological media (ceramic rings or bio balls) second
- Chemical media (activated carbon) last, if used
This order helps trap debris before water reaches the beneficial bacteria.
Step 4 – Position the Filter
Install the filter according to its design.
- Hang HOB filters securely on the back of the aquarium.
- Place sponge and internal filters completely underwater.
- Position canister filter intake and output pipes on opposite sides of the tank when possible.
Proper placement improves water circulation and reduces dead spots.
Step 5 – Fill the Filter (Prime if Needed)
Many Hang-on-Back and canister filters need priming before they start.
Fill the filter chamber with aquarium water before turning it on. Some modern canister filters include a manual priming button, while others require siphoning according to the manufacturer’s instructions.
Never run a filter while it is dry. Doing so may damage the motor.
Step 6 – Start the Filter
Plug the filter into a grounded electrical outlet with a drip loop in the power cord.
The filter should begin circulating water within a few seconds. Listen for unusual noises that may indicate trapped air or incorrect assembly.
Step 7 – Check Water Flow
Watch the filter for several minutes after startup.
Make sure:
- Water flows steadily.
- There are no leaks around hoses or connections.
- The surface has gentle movement for oxygen exchange.
- Fish are not struggling against excessive current.
If the flow is too strong, adjust the output or install a flow diffuser if your filter supports one.
Step 8 – Monitor During the First 24 Hours
Observe the aquarium closely during the first day.
Check for stable water flow, unusual sounds, and leaking connections. If your aquarium is newly set up, continue monitoring water quality while the beneficial bacteria establish during the nitrogen cycle.
A quick inspection during the first 24 hours can prevent bigger problems later.
Expert Tip
Keep the filter running continuously once it is installed. Turning it off for long periods reduces oxygen inside the filter, which can harm the beneficial bacteria that keep your aquarium healthy.
How to Set Up a Freshwater Aquarium Filter
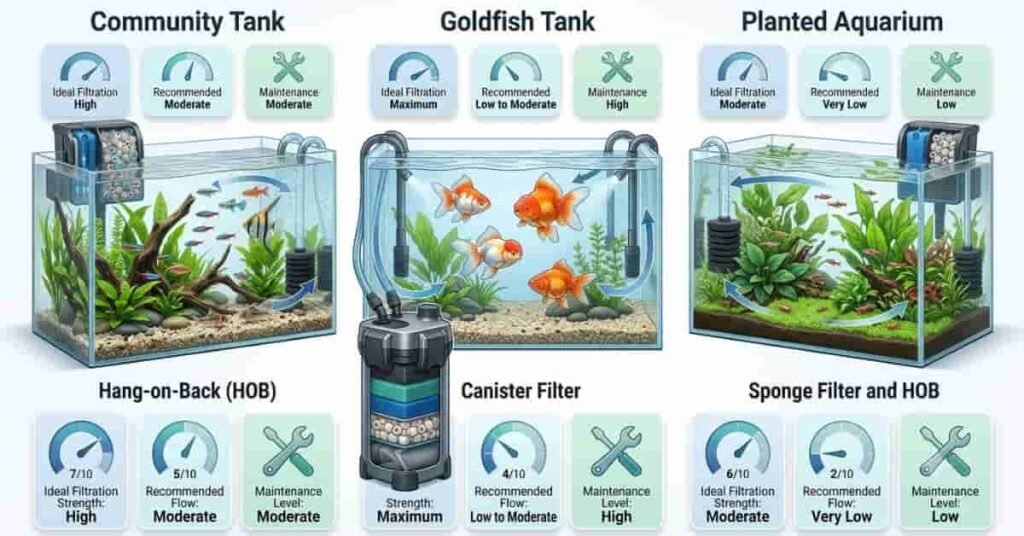
A proper how to setup a freshwater aquarium filter process depends on the type of aquarium you own. While the installation steps are similar, different fish and plants have unique filtration needs. Choosing the right flow rate and filter style helps create a healthier environment and reduces future maintenance.
Community Tanks
Community aquariums usually contain a mix of peaceful fish, such as tetras, rasboras, and corydoras. A Hang-on-Back (HOB) filter or a small canister filter provides reliable mechanical and biological filtration for these setups.
Position the filter outlet to create gentle water movement across the entire tank. This improves oxygen exchange without producing excessive current.
Goldfish Tanks
Goldfish produce more waste than most tropical fish. They require stronger filtration and larger biological media capacity to maintain good water quality.
Choose a filter rated for a larger aquarium than your actual tank size whenever possible. Extra filtration helps manage the increased waste load and keeps ammonia levels under control.
Planted Aquariums
Live plants prefer steady water circulation rather than strong currents. Excessive flow can damage delicate leaves and make it difficult for some fish to swim comfortably.
Use an adjustable HOB filter, sponge filter, or canister filter with a spray bar to distribute water evenly throughout the aquarium.
Beginner Recommendations
If this is your first aquarium, keep the setup simple.
- Choose a filter rated for your tank size.
- Install both mechanical and biological media.
- Keep the filter running 24/7.
- Clean media using aquarium water instead of tap water.
- Avoid replacing all filter media at once.
Expert Tip
Many beginners buy the smallest filter that fits their tank. Choosing the next size up often improves water quality without increasing maintenance.
Key Takeaways
- Community tanks need balanced water circulation.
- Goldfish benefit from stronger filtration.
- Planted aquariums prefer gentle, even flow.
- Beginners should focus on simple, reliable filtration with proper maintenance.
Canister Aquarium Filter Setup
A canister aquarium filter setup provides powerful filtration for medium and large aquariums. Although installation takes a little longer than other filter types, the extra effort delivers excellent water quality and quieter operation.
Follow these steps carefully to avoid leaks and ensure maximum performance.
Install the Intake and Output Pipes
Attach the intake pipe inside the aquarium where it can collect debris efficiently. Place the output pipe or spray bar on the opposite side of the tank to improve water circulation.
Keep the intake a few inches above the substrate to prevent gravel from entering the filter.
Prime the Filter
Most canister filters must be filled with water before starting.
Some models include a manual priming pump, while others begin siphoning automatically after filling the hoses. Follow the manufacturer’s instructions for your specific filter.
Never run the motor without water inside the canister.
Start Water Flow
Plug the filter into a grounded outlet after priming.
Water should begin flowing smoothly within a few moments. Small air bubbles are normal during the first few minutes as trapped air leaves the system.
If water does not circulate, stop the filter and check the hose connections or repeat the priming process.
Check for Leaks
Inspect every hose, valve, and connection after the filter starts.
Run your fingers around the fittings to check for moisture. Tighten loose connections carefully without over-tightening plastic parts.
Watch the filter for at least 15 minutes before leaving it unattended.
Practical Tips
- Keep hoses as short and straight as possible.
- Clean the intake strainer regularly.
- Close shut-off valves before maintenance.
- Label intake and output hoses for easier cleaning.
- Leave enough space around the canister for future maintenance.
Expert Tip
Place the canister filter below the aquarium. Gravity helps maintain proper water flow and improves filter performance.
Key Takeaways
- Install intake and output pipes on opposite sides of the aquarium.
- Prime the filter completely before turning it on.
- Check every connection for leaks after startup.
- Proper hose placement improves water circulation and filter efficiency.
Sponge Filter Setup
An aquarium sponge filter setup is one of the easiest filtration systems for beginners. It provides excellent biological filtration while creating gentle water movement. Sponge filters are ideal for shrimp tanks, betta aquariums, breeding tanks, and other small freshwater setups.
Connect the Air Pump
Place the air pump outside the aquarium on a stable surface. It powers the sponge filter by pushing air through the airline tubing.
If possible, position the air pump above the water level. Otherwise, install a check valve to prevent backflow.
Attach the Airline Tubing
Connect one end of the airline tubing to the air pump and the other end to the sponge filter.
Check that the tubing fits tightly at both ends to prevent air leaks.
Install a Check Valve
A check valve is a small but important safety device.
Install it in the airline tubing with the arrow pointing toward the aquarium. It prevents water from flowing backward into the air pump during a power outage.
Adjust the Air Flow
Turn on the air pump and adjust the airflow if your pump has a control valve.
The sponge filter should produce a steady stream of small bubbles. Too much airflow creates unnecessary current, while too little reduces filtration.
Choose the Best Placement
Place the sponge filter in a back corner of the aquarium where it remains hidden but still circulates water throughout the tank.
Avoid placing decorations directly against the sponge because they can reduce water flow.
Pro Tip
Squeeze the sponge gently in a bucket of aquarium water during maintenance. This removes trapped debris while protecting beneficial bacteria.
Key Takeaways
- Connect the sponge filter securely to an air pump.
- Install a check valve to protect the air pump.
- Adjust airflow for steady bubbles and gentle circulation.
- Position the sponge filter where it provides even water movement.
- Clean the sponge with aquarium water instead of tap water.
Aquarium Filter Media Explained
Filter media is the material inside your aquarium filter that cleans the water. Most modern filters use different types of media because each one removes a specific kind of waste. Choosing the right media helps your aquarium filter setup perform efficiently and keeps your aquarium healthier.
Some media trap solid debris, while others provide a home for beneficial bacteria or remove dissolved impurities. Understanding the purpose of each type makes maintenance easier and prevents replacing media too often.
| Filter Media | Main Purpose | When to Replace |
|---|---|---|
| Sponge | Traps debris and supports beneficial bacteria | Replace only when damaged; rinse regularly with aquarium water |
| Ceramic Rings | Biological filtration by growing beneficial bacteria | Replace only if broken or worn |
| Bio Balls | Biological filtration for high oxygen environments | Rarely replace; clean gently when needed |
| Activated Carbon | Removes odors, discoloration, medications, and dissolved chemicals | Every 3–4 weeks or after medication treatment |
| Filter Floss | Captures fine particles for crystal-clear water | Replace when heavily clogged or worn |
Remember that biological media should never be replaced all at once. Beneficial bacteria live on these surfaces and help break down harmful ammonia and nitrite.
Expert Tip
When replacing mechanical media like filter floss, keep your biological media untouched whenever possible. This helps preserve the bacteria colony and keeps your aquarium stable.
Key Takeaways
- Different filter media perform different jobs.
- Sponge and biological media should last for years with proper care.
- Activated carbon requires regular replacement.
- Never replace all filter media at the same time.
- Clean reusable media using aquarium water instead of tap water.
How Long Should an Aquarium Filter Run?
An aquarium filter should run 24 hours a day, 7 days a week. Continuous filtration keeps the water clean, supports beneficial bacteria, and maintains healthy oxygen levels. Turning the filter off for long periods can quickly affect water quality, especially in smaller aquariums.
Why Turning the Filter Off Is Harmful
Beneficial bacteria need a constant supply of oxygen-rich water. When the filter stops for several hours, oxygen levels inside the filter drop. This can damage or kill the bacteria that remove harmful ammonia and nitrite.
Stopping the filter also allows waste to build up and reduces water circulation.
During Feeding
Most aquariums do not require the filter to be turned off during feeding.
If floating food is pulled into the filter too quickly, reduce the flow temporarily if your filter has an adjustable control. Restart full flow as soon as feeding is finished.
During Maintenance
Always unplug the filter before cleaning or servicing it.
Complete maintenance as quickly as possible and restart the filter immediately after reassembly. Avoid leaving biological media without water for extended periods.
Expert Tip
If you must shut down the filter for maintenance, keep the biological media submerged in aquarium water. This helps protect the beneficial bacteria until the filter is running again.
Key Takeaways
- Aquarium filters should run continuously.
- Turning the filter off for long periods can harm beneficial bacteria.
- Temporary shutdowns are only recommended during maintenance.
- Restart the filter immediately after cleaning.
- Continuous water flow supports healthier fish and more stable water quality.
Common Aquarium Filter Problems
Even the best aquarium filters can develop problems over time. Most issues are easy to fix if you identify the cause early. Regular maintenance and proper installation help prevent many common filter failures.
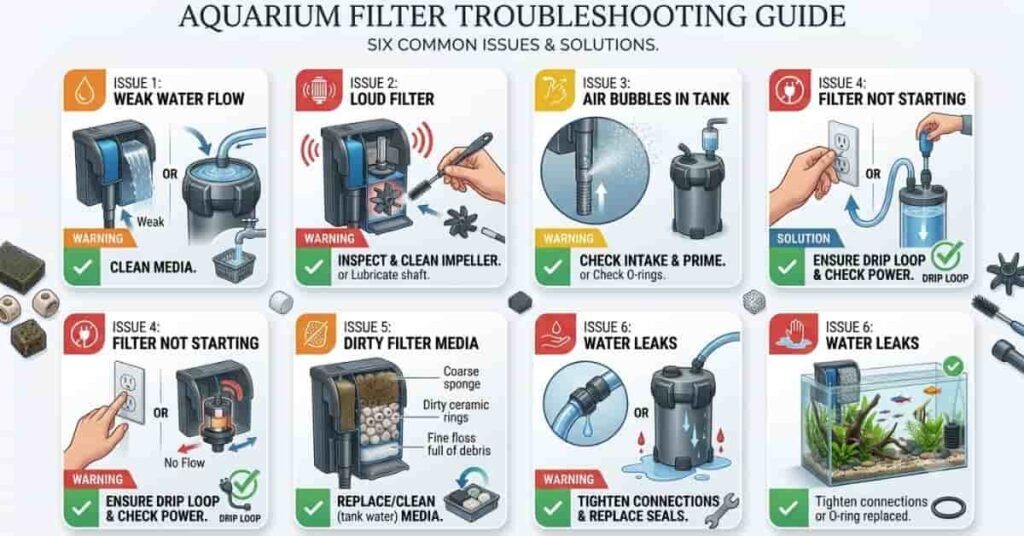
Weak Water Flow
Reduced water flow usually means the filter media or intake tube is clogged.
Clean the sponge, filter floss, and intake strainer using aquarium water. Check for blocked hoses if you use a canister filter.
Loud Filter
A noisy filter often has trapped air, a dirty impeller, or loose parts.
Inspect the impeller, remove debris, and make sure every component is securely installed. For HOB filters, keeping the water level high also reduces splashing noise.
Air Bubbles
Small bubbles are normal when starting a new filter. They usually disappear after trapped air escapes.
If bubbles continue, inspect hose connections for air leaks or check whether the water level is too low.
Filter Not Starting
First, confirm the power outlet is working.
Then inspect the power cord, impeller, and filter assembly. Canister filters may also need to be primed again before water begins flowing.
Dirty Media
Dirty filter media reduces water flow and filtration efficiency.
Rinse reusable media in old aquarium water whenever flow decreases. Replace disposable media only when necessary.
Water Leaks
Leaks usually occur around hose connections, O-rings, or loose fittings.
Turn off the filter immediately if you notice water leaking. Inspect seals, tighten connections, and replace worn O-rings if needed before restarting.
Expert Tip
Inspect your filter for a few minutes every week. Small problems are much easier to fix before they become major repairs.
Key Takeaways
- Weak flow often points to clogged media or blocked tubing.
- Loud filters usually need cleaning or trapped air removed.
- Persistent air bubbles may indicate an air leak.
- Check power and priming if the filter will not start.
- Regular maintenance prevents most common aquarium filter problems.
Aquarium Filter Maintenance Checklist
Regular maintenance keeps your aquarium filter setup working efficiently and helps prevent common water quality problems. You don’t need to clean everything at once. Instead, follow a simple schedule that keeps the filter running while protecting the beneficial bacteria living inside the filter media.
A few minutes of routine care can improve water clarity, extend your filter’s lifespan, and create a healthier environment for your fish.
| Maintenance Schedule | What to Do |
|---|---|
| Daily | Check that the filter is running, inspect water flow, listen for unusual noises, and make sure there are no leaks. |
| Weekly | Remove debris from the intake strainer, check airline tubing (if using a sponge filter), and inspect the filter for buildup. |
| Monthly | Rinse reusable filter media with old aquarium water, clean the impeller, wipe the filter housing, and inspect hoses or seals. |
| Every 3–6 Months | Replace activated carbon if used, inspect O-rings and tubing for wear, replace damaged media, and deep-clean the filter housing without disturbing all biological media. |
Try not to clean every piece of filter media during the same maintenance session. Leaving some mature biological media untouched helps preserve the beneficial bacteria that keep your aquarium stable.
Common Beginner Mistakes
Setting up an aquarium filter is simple, but small mistakes can lead to poor water quality and unhealthy fish. Many beginners focus on keeping the filter clean without realizing they may also remove the beneficial bacteria their aquarium needs. Avoiding these common errors will help your filter perform better and keep your aquarium stable.
Cleaning Filter Media with Tap Water
Tap water often contains chlorine or chloramine, which can kill beneficial bacteria living on the filter media.
Instead, rinse reusable media in a bucket of old aquarium water during a water change. This removes debris while protecting the bacteria colony.
Replacing All Media at Once
Many new aquarium owners replace every filter cartridge and biological media at the same time. This removes most of the beneficial bacteria and may cause ammonia or nitrite levels to rise.
Replace disposable media only when necessary, and never replace all biological media at once.
Choosing the Wrong Filter Size
A filter that’s too small may not provide enough water circulation or biological filtration.
Always choose a filter designed for your aquarium size. If you’re between two sizes, the larger model is usually the better choice for most freshwater aquariums.
Turning the Filter Off Overnight
Some beginners switch off the filter to reduce noise while sleeping.
This is not recommended. Beneficial bacteria need a constant flow of oxygen-rich water. Turning the filter off every night can weaken the biological filtration and affect water quality.
Over-Cleaning Beneficial Bacteria
A spotless filter isn’t always a healthy filter.
Cleaning every sponge, ceramic ring, and bio ball during the same maintenance session removes too much beneficial bacteria. Clean only what is necessary and leave some mature media undisturbed.
Expert Tip
Think of your filter as a living ecosystem, not just a cleaning device. Protecting beneficial bacteria is just as important as removing dirt and debris.
Key Takeaways
- Never rinse reusable filter media with tap water.
- Avoid replacing all filter media at once.
- Choose a filter that matches your aquarium size.
- Keep your filter running 24/7.
- Preserve beneficial bacteria by cleaning only part of the media during maintenance.
Conclusion
Setting up the right filter is one of the best investments you can make for a healthy aquarium. In this guide, you’ve learned how to choose the right equipment, complete a proper aquarium filter setup, maintain filter media, and solve common problems before they affect your fish. Remember to choose a filter based on your aquarium’s needs, not just its price, and always protect beneficial bacteria during cleaning. If you’re planning a canister aquarium filter setup or a simple sponge filter, following these best practices will help keep your water clean and your fish thriving for years.
Have a question or a helpful tip? Share it in the comments below. You can also explore our other aquarium care guides to learn more about filtration, maintenance, and building a healthy aquarium with confidence.
Frequently Asked Questions
Find quick answers to the most common questions about aquarium filter setup, maintenance, and troubleshooting.
A Hang-on-Back (HOB) filter is the best option for most beginners because it is easy to install, maintain, and clean. It provides mechanical, biological, and optional chemical filtration in one compact unit. If you have a small betta, shrimp, or breeding tank, a sponge filter is another beginner-friendly choice.
Yes. Running two filters can improve water circulation, increase biological filtration, and provide backup if one filter stops working. Many aquarium owners combine a sponge filter with a Hang-on-Back or canister filter for better overall filtration.
Check your filter every week and clean it whenever water flow begins to slow. Most reusable filter media only needs cleaning about once a month. Always rinse reusable media in old aquarium water instead of tap water to protect beneficial bacteria.
Yes. Your aquarium filter should run continuously, day and night. Constant water flow keeps beneficial bacteria alive, removes waste, and maintains healthy oxygen levels. Turning the filter off for long periods can quickly affect water quality.
A sponge filter is enough for many small freshwater aquariums, including betta tanks, shrimp tanks, breeding tanks, and quarantine tanks. Larger or heavily stocked aquariums usually benefit from a Hang-on-Back or canister filter with stronger filtration.
Most filter noise is caused by trapped air, a dirty impeller, loose parts, or a low water level. Clean the impeller regularly, tighten loose components, and keep the water level high enough for Hang-on-Back filters. Proper maintenance solves most noise issues.
No. Aquarium filters should remain on 24 hours a day. Beneficial bacteria need a continuous flow of oxygen-rich water to survive. Turning the filter off every night can weaken biological filtration and increase ammonia levels.
The best filter depends on your aquarium size. Sponge filters work well for nano planted tanks, adjustable Hang-on-Back filters are excellent for most community aquariums, and canister filters provide superior filtration for larger planted tanks with gentle water circulation.
A properly working filter produces steady water flow, creates gentle surface movement, and operates quietly. Clear water, healthy fish behavior, and stable water test results are also signs that your filtration system is performing well.
A new aquarium filter usually takes several weeks to establish enough beneficial bacteria through the nitrogen cycle. During this period, monitor your water parameters regularly and avoid replacing biological filter media unless it becomes damaged.

The Aquarium Advisor Team was founded by Daniel Carter (Austin, Texas, USA) and Emily Parker (Tampa, Florida, USA), two passionate aquarium enthusiasts dedicated to helping hobbyists build healthy and thriving aquariums.
They created AquariumAdvisor.com to share practical aquarium guides and professional online calculators. Every calculator is developed with experienced software developers to ensure accurate, reliable, and easy-to-use results for aquarium owners of all experience levels.