
Table of Contents
Introduction
Have you ever wondered why experienced aquarists keep crystal-clear tanks with healthier fish and corals?
An aquarium sump setup is one of the best upgrades you can make for better filtration and stable water conditions. While it may seem complicated at first, beginners across the USA can successfully install a sump with the right guidance. Whether you’re planning a freshwater aquarium sump setup or a saltwater aquarium sump setup, understanding the basics will help you avoid common mistakes and build a more reliable system.
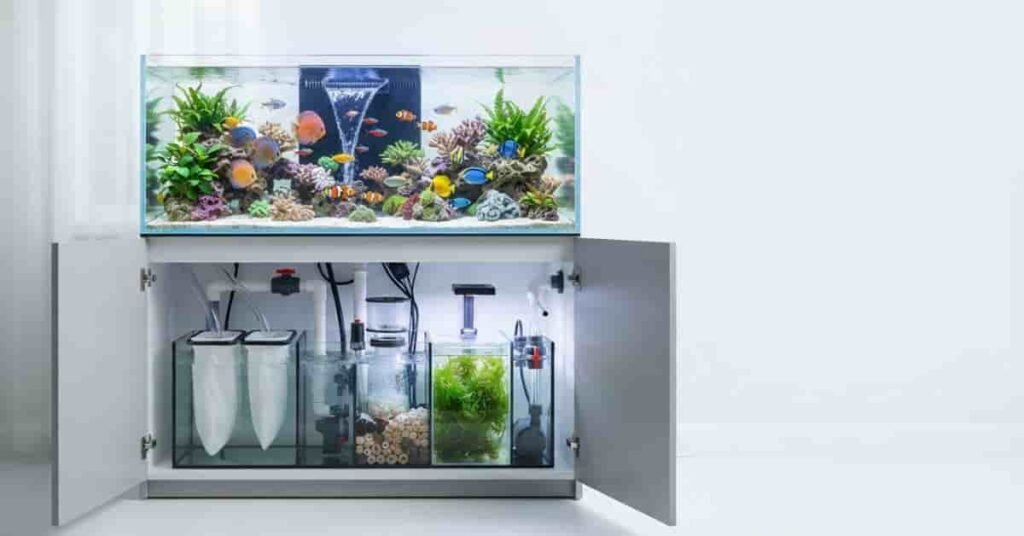
In simple terms, a sump is an extra tank placed below your main aquarium. It increases water volume, hides equipment, and improves filtration. That’s why many experienced hobbyists rely on sump systems for cleaner, healthier aquariums.
This guide explains everything step by step, from choosing the right equipment to installing plumbing and adjusting water flow. You’ll also learn how sump systems work, whether you need one, how to maintain it, and how to troubleshoot common problems. By the end, you’ll have the confidence to build a sump system that keeps your aquarium running smoothly for years.
What Is an Aquarium Sump?
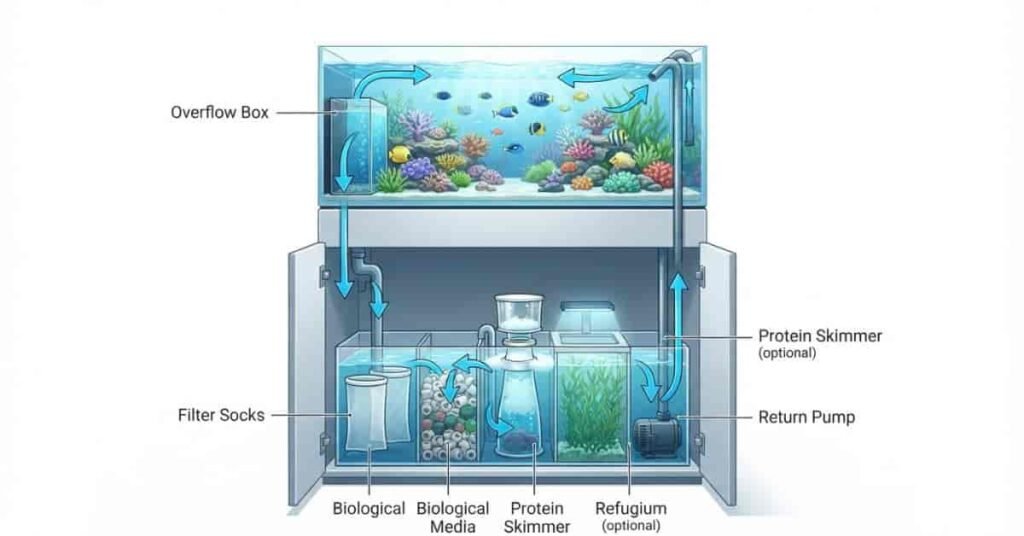
An aquarium sump setup uses a separate tank, usually placed inside the aquarium stand, to improve filtration and increase total water volume. Water leaves the display tank through an overflow, passes through different filtration stages inside the sump, and returns through a pump. This continuous cycle keeps the aquarium cleaner and more stable.
Choosing the right filtration system is an important part of any successful aquarium setup. Our Aquarium Filter Setup Guide explains how to choose, install, and optimize different types of aquarium filters.
Many experienced aquarists choose a sump because it provides more space for filtration equipment than a standard hang-on-back or canister filter. It also keeps heaters, protein skimmers, and other equipment out of sight. As a result, the main aquarium looks cleaner and offers more room for fish, plants, or corals.
A sump works well for both freshwater and saltwater aquariums. However, it is especially popular in reef and marine systems where stable water conditions are essential. If you want easier maintenance and better water quality, a sump is a smart long-term investment.
Expert Tip: Choose a sump that holds at least 20–40% of your display tank’s volume. The extra water helps maintain stable temperature and water chemistry.
How a Sump Works
A sump creates a continuous water circulation system between your display aquarium and a second tank below it. Water first flows through an overflow box or overflow weir. Gravity carries it into the sump, where it passes through several filtration chambers.
The first chamber usually contains mechanical filtration, such as filter socks or filter floss, to remove uneaten food and debris. The next chamber often holds biological media, where beneficial bacteria break down harmful ammonia and nitrite. In a marine aquarium sump setup, this section may also include a protein skimmer or a refugium with live rock and macroalgae.
After filtration, the water reaches the final chamber. A return pump sends the clean water back to the display tank, creating a constant cycle that runs 24 hours a day.
This design improves oxygen exchange, keeps water moving, and maintains stable water quality throughout the aquarium.
Pro Tip
Before adding fish, perform a power outage test. Turn off the return pump and make sure the sump can safely hold all draining water without overflowing.
Benefits of Using a Sump
A properly designed sump setup for aquarium systems offers several advantages over traditional filters. It improves water quality, increases equipment space, and makes maintenance easier. These benefits become even more valuable as your aquarium grows.
More Water Volume
A sump increases your aquarium’s total water capacity. More water changes temperature and water chemistry more slowly, creating a healthier environment for fish and corals.
Better Filtration
A sump provides room for multiple filtration stages. You can combine mechanical, biological, and chemical filtration for cleaner water than many standard filters can provide.
Cleaner Display Tank
Heaters, probes, skimmers, and other equipment stay inside the sump instead of the main aquarium. This gives your display tank a neat, natural appearance.
Hidden Equipment
Keeping equipment below the aquarium reduces visual clutter and leaves more swimming space for fish. It also makes future upgrades much easier.
Improved Water Stability
Higher water volume, better gas exchange, and continuous filtration help maintain stable temperature, oxygen levels, and water chemistry. These stable conditions reduce stress for fish and support healthier aquatic life.
Do You Need a Sump?
Whether you need an aquarium sump setup depends on your aquarium goals. A sump is not required for every tank, but it offers major advantages if you want better filtration, easier maintenance, and stable water conditions. Many beginners start without one, yet they often upgrade to a sump as their experience grows.
A sump is especially useful for larger aquariums or tanks with a heavy fish load. It increases total water volume, provides extra space for filtration, and keeps equipment hidden from view. While it costs more than a standard filter, many hobbyists find the long-term benefits worth the investment.
Let’s look at the types of aquariums that benefit the most from a sump system.
Best for Saltwater Aquariums
A saltwater aquarium sump setup is one of the most popular filtration choices for marine tanks. Saltwater fish and invertebrates need stable water quality, and a sump helps maintain those conditions.
It also provides space for equipment that many marine tanks require, including a protein skimmer, heater, reactors, and auto top-off system. Keeping this equipment below the display tank creates a cleaner look and makes maintenance easier.
Best for Reef Tanks
Reef aquariums benefit the most from a sump because corals are sensitive to changes in water quality. A sump increases water volume, which helps keep temperature, salinity, and nutrient levels more stable.
Many reef keepers also use a refugium inside the sump. This section can hold live rock and macroalgae that support natural filtration and help control excess nutrients. Together, these features create a healthier environment for corals and other reef animals.
Pro Tip
Leave enough space in the return chamber for daily water evaporation. This helps prevent the return pump from running dry between top-offs.
Can Freshwater Aquariums Use a Sump?
Yes. A freshwater aquarium sump setup can work very well, especially for larger aquariums. While many freshwater tanks use canister or hang-on-back filters, a sump provides greater filtration capacity and more flexibility.
A sump is an excellent choice for large community tanks, cichlid aquariums, goldfish tanks, and heavily stocked fish systems. It also makes maintenance easier because filter media is more accessible than in many sealed filters.
However, a sump may not be necessary for small freshwater aquariums under 40 gallons. In those cases, a quality canister or hang-on-back filter often provides enough filtration at a lower cost.
Pro Tip
If you’re building a planted freshwater aquarium, position the return outlet to create gentle water movement. This improves circulation without stressing delicate plants.
Pros and Cons of an Aquarium Sump
| Pros | Cons |
|---|---|
| Increases total water volume for better stability | Higher initial cost |
| Provides excellent mechanical and biological filtration | Requires more installation time |
| Hides heaters, pumps, and other equipment | Needs extra cabinet space |
| Makes equipment maintenance easier | Plumbing mistakes can cause leaks |
| Supports future upgrades like refugiums and reactors | Return pump adds some power consumption |
| Creates a cleaner-looking display tank | Can be noisy if not installed correctly |
Types of Aquarium Sump Systems
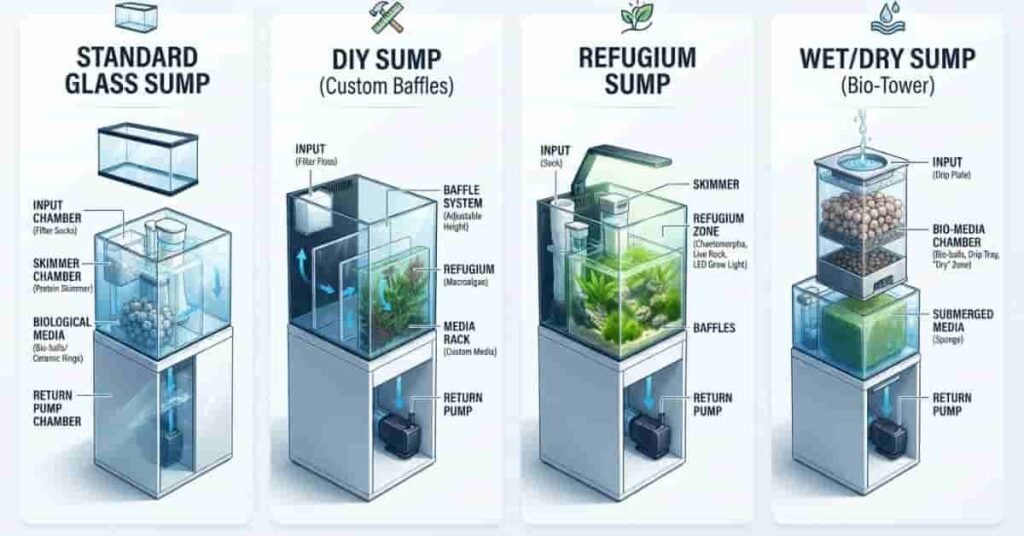
Choosing the right aquarium sump setup starts with selecting a sump that matches your aquarium’s size and goals. Different sump designs offer different benefits. Some focus on simplicity, while others provide advanced filtration for reef or heavily stocked tanks.
For most beginners, a standard glass sump is the easiest and most reliable option. Experienced hobbyists may prefer a DIY or refugium sump for greater customization. Understanding each type will help you choose a system that fits your budget, maintenance routine, and livestock.
Sumps are especially useful in larger marine systems because they provide extra space for filtration equipment. If you’re planning a saltwater tank, our Marine Aquarium Setup Guide covers the essential equipment and setup process.
Standard Glass Sump
A standard glass sump is the most common choice for both freshwater and saltwater aquariums. It is usually made from a glass aquarium with built-in acrylic or glass baffles that create separate filtration chambers.
Most standard sumps include sections for mechanical filtration, biological media, and a return pump. Some models also have space for a protein skimmer or a small refugium.
These sumps are easy to install, widely available, and suitable for beginners. They also require less planning than custom-built systems.
DIY Sump
A DIY sump is a custom filtration system that you build yourself. Many hobbyists convert a spare aquarium into a sump by adding glass or acrylic baffles.
A DIY sump gives you complete control over the chamber layout. You can design separate sections for filter socks, biological media, a refugium, reactors, or additional equipment.
Building your own sump often costs less than buying a pre-made model. However, it requires careful planning and accurate measurements. Poorly placed baffles or incorrect water levels can reduce performance.
Refugium Sump
A refugium sump includes a dedicated chamber where beneficial organisms can grow. This section often contains live rock, macroalgae, and small microorganisms that improve natural filtration.
A refugium is especially popular in marine aquarium sump setup and reef systems. Macroalgae absorb excess nitrate and phosphate, while copepods and other tiny organisms become a natural food source for many reef fish.
Although freshwater aquariums can include a refugium, it is far more common in saltwater setups.
Wet/Dry Sump
A wet/dry sump uses biological media that stays partly exposed to air while water flows over it. This design increases oxygen levels around beneficial bacteria, allowing them to process waste efficiently.
Wet/dry filters were once the standard choice for fish-only marine systems and heavily stocked freshwater aquariums. They still provide excellent biological filtration, especially in tanks with large fish that produce a lot of waste.
However, many modern reef keepers choose refugium sumps instead because wet/dry systems can allow nitrate levels to build over time.
Comparison of Aquarium Sump Types
| Sump Type | Best For | Main Advantages | Possible Drawbacks |
|---|---|---|---|
| Standard Glass Sump | Most freshwater and saltwater tanks | Easy to install, beginner-friendly, reliable | Less customizable |
| DIY Sump | Hobbyists who want custom layouts | Affordable, flexible, upgrade-friendly | Requires planning and building skills |
| Refugium Sump | Reef and marine aquariums | Natural nutrient control, supports beneficial organisms | Needs extra lighting and regular algae maintenance |
| Wet/Dry Sump | Fish-only marine tanks and large freshwater aquariums | Excellent biological filtration and oxygen exchange | May increase nitrate levels in reef tanks |
Equipment Needed for an Aquarium Sump Setup
A successful aquarium sump setup depends on using the right equipment. Each component has a specific job, from moving water to removing waste and maintaining stable water conditions. Choosing quality equipment from the start helps prevent leaks, improves filtration, and reduces maintenance over time.
Reef tanks often benefit from the additional filtration and equipment space that a sump provides. For a complete overview of building a reef system, see our Reef Aquarium Setup Guide.
Some items are essential for every sump system, while others are optional upgrades based on your aquarium type. For example, a protein skimmer is highly recommended for saltwater tanks but is usually unnecessary for freshwater aquariums.
Below are the key components you’ll need to build a reliable sump system.
Overflow Box
An overflow box moves water safely from the display aquarium to the sump. It maintains a constant water level inside the main tank while allowing gravity to carry water into the filtration system.
Drilled aquariums with built-in overflow weirs are the most reliable option. If your aquarium is not drilled, you can use a hang-on-back overflow box designed for your tank size.
Drain Pipe
The drain pipe carries water from the overflow box to the sump. Most systems use PVC plumbing because it is durable, affordable, and easy to customize.
Many hobbyists install gate valves or ball valves to fine-tune water flow and reduce overflow noise.
Filter Socks
Filter socks provide the first stage of mechanical filtration. They trap uneaten food, fish waste, and floating debris before it reaches the biological media.
Most filter socks are reusable and should be cleaned regularly to maintain good water flow.
Filter Media
Filter media supports beneficial bacteria that convert harmful ammonia into safer compounds through the nitrogen cycle. Common biological media include ceramic rings, bio balls, porous rock, and sintered glass.
Some aquariums also use activated carbon or phosphate-removing media for additional chemical filtration when needed.
Protein Skimmer
A protein skimmer removes dissolved organic waste before it breaks down into harmful compounds. It is one of the most valuable pieces of equipment in a saltwater aquarium sump setup.
Freshwater aquariums generally do not require a protein skimmer.
Return Pump
The return pump sends filtered water back to the display aquarium. It is the heart of the sump system and should provide enough flow without overwhelming the overflow.
Consider both flow rate and head height when selecting a pump.
Return Plumbing
Return plumbing carries clean water from the pump back to the aquarium. Most systems use PVC pipe, flexible tubing, or a combination of both.
Adding check valves, unions, and directional return nozzles can improve performance and simplify maintenance.
Heater
Placing the heater inside the sump keeps it hidden while providing even heat distribution throughout the aquarium. It also protects fish and plants from accidental contact with the heater.
Large aquariums often use two smaller heaters instead of one large unit for better reliability.
Auto Top-Off (ATO) System
An Auto Top-Off (ATO) system automatically replaces water lost through evaporation. This keeps water levels stable and is especially important in saltwater aquariums where evaporation increases salinity.
Although optional, an ATO reduces daily maintenance and helps maintain consistent water parameters.
Pro Tip
Use only fresh RO/DI water in your ATO reservoir. Never top off with saltwater, as only water evaporates.
Equipment Checklist
| Equipment | Required | Freshwater | Saltwater |
|---|---|---|---|
| Overflow Box | ✅ | ✅ | ✅ |
| Drain Pipe | ✅ | ✅ | ✅ |
| Filter Socks | ✅ | ✅ | ✅ |
| Biological Filter Media | ✅ | ✅ | ✅ |
| Return Pump | ✅ | ✅ | ✅ |
| Return Plumbing | ✅ | ✅ | ✅ |
| Heater | ✅ | ✅ | ✅ |
| Protein Skimmer | Optional | ❌ Usually Not Needed | ✅ Highly Recommended |
| Auto Top-Off (ATO) | Optional | Optional | ✅ Recommended |
How to Set Up an Aquarium Sump (Step-by-Step)
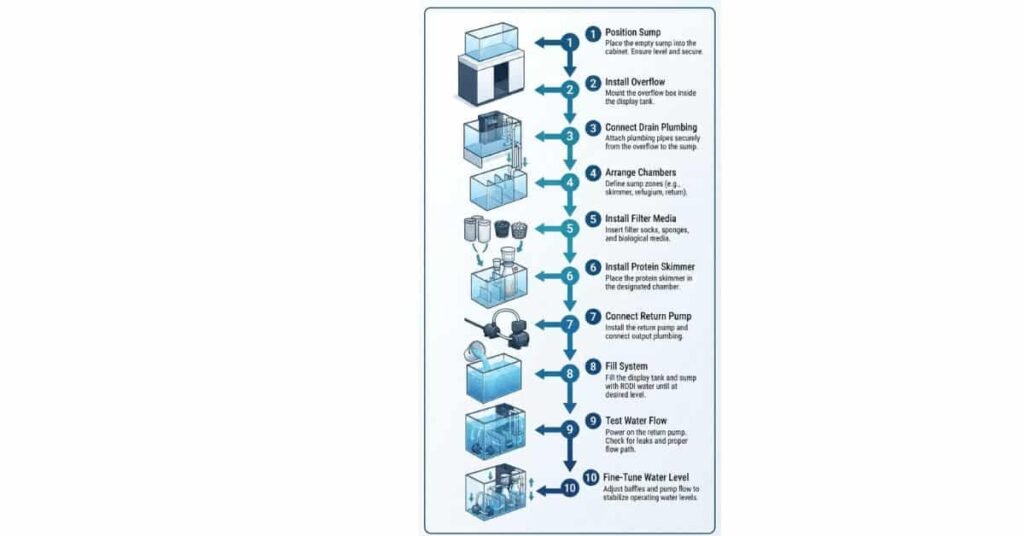
A successful aquarium sump tank setup is easier than many beginners expect. The key is to install each component in the correct order and test the system before adding fish or corals. Taking your time during setup helps prevent leaks, noisy plumbing, and water level problems later.
Follow these ten simple steps to build a reliable sump setup for aquarium systems.
Step 1 – Position the Sump
Place the sump inside your aquarium cabinet or beneath the display tank. Make sure the stand is level and strong enough to support the full weight of the sump when it is filled with water.
Leave enough space around the sump for maintenance and future equipment upgrades. Check that you can easily remove filter socks, clean the skimmer, and access the return pump.
Step 2 – Install the Overflow
Install the overflow according to your aquarium type. If your tank has a drilled overflow, inspect the bulkheads and tighten them securely. For non-drilled tanks, mount a quality hang-on-back overflow box following the manufacturer’s instructions.
The overflow should maintain a consistent display tank water level while allowing water to drain safely into the sump.
Step 3 – Connect Drain Plumbing
Connect the overflow to the sump using PVC pipe or flexible tubing. Secure every fitting to prevent leaks and support the plumbing where needed.
If possible, install a gate valve to fine-tune the drain flow and reduce overflow noise. Double-check every connection before adding water.
Step 4 – Arrange Sump Chambers
Organize each sump chamber in the correct order for efficient filtration.
A typical layout looks like this:
Overflow → Filter Socks → Biological Media → Protein Skimmer (optional) → Refugium (optional) → Return Pump
This arrangement removes debris first, protects beneficial bacteria, and ensures clean water reaches the return pump.
Step 5 – Install Filter Media
Place mechanical filter socks in the first chamber to catch debris. Next, add biological media such as ceramic rings or porous bio media in the following chamber.
If you plan to use activated carbon or phosphate-removing media, install it according to the manufacturer’s recommendations.
Step 6 – Install the Protein Skimmer
If you have a saltwater aquarium, place the protein skimmer in the chamber with the recommended water depth. Most skimmers perform best when the water level stays constant.
Freshwater aquariums usually do not require this equipment.
Step 7 – Connect the Return Pump
Position the return pump in the final chamber and connect it to the return plumbing. Attach flexible tubing or PVC pipe securely to minimize vibration and leaks.
Avoid selecting a pump that moves more water than your overflow can safely handle.
Step 8 – Fill the System
Fill both the display aquarium and sump with fresh water for an initial leak test. After confirming that everything works correctly, drain the system if necessary and refill it with the appropriate water for your aquarium.
Use dechlorinated water for freshwater tanks or properly mixed saltwater for marine aquariums.
Step 9 – Test Water Flow
Turn on the return pump and observe the entire system for at least 30 minutes. Watch the overflow, plumbing, sump chambers, and return outlet for smooth water movement.
Check carefully for leaks, unusual vibrations, excessive noise, or trapped air bubbles.
Step 10 – Fine-Tune Water Level
Adjust the return pump flow and overflow until the system runs quietly and maintains stable water levels.
Finally, perform a power outage test. Turn off the return pump and make sure the sump can safely hold all draining water without overflowing. Restart the system and confirm that normal operation resumes automatically.
Expert Tip: Experienced aquarists often run a new sump system with freshwater for 24 hours before adding saltwater or livestock. This simple test helps identify leaks, plumbing issues, and incorrect water levels without risking expensive fish or corals.
Saltwater Aquarium Sump Setup
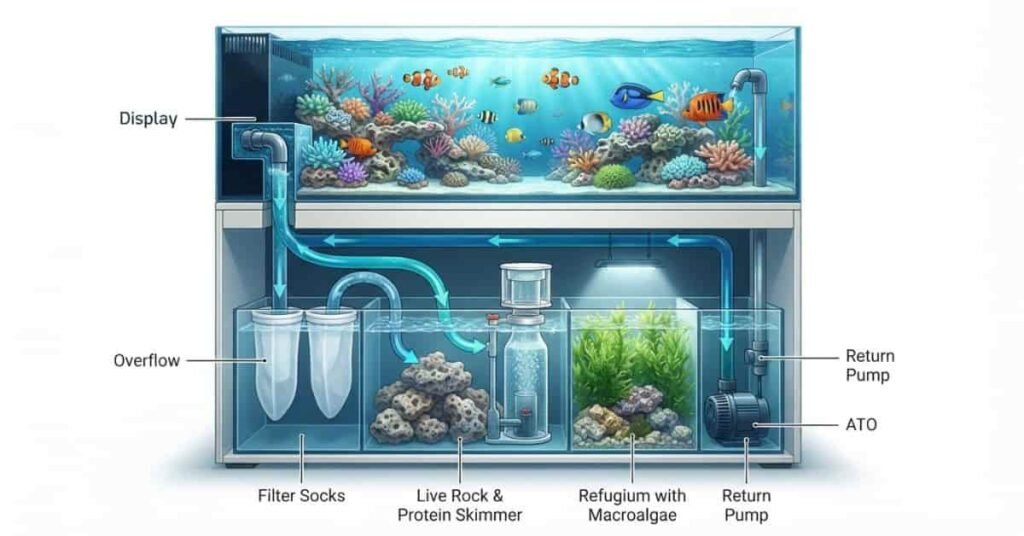
A saltwater aquarium sump setup provides the filtration and stability needed for healthy marine fish and corals. While you can run a saltwater tank without a sump, most hobbyists choose one because it improves water quality and hides essential equipment. It also increases total water volume, making temperature and salinity more stable.
A well-designed marine aquarium sump setup usually includes four key filtration components that work together to keep the aquarium clean and balanced.
Live Rock
Live rock is one of the most important biological filters in a saltwater aquarium. Its porous surface provides a home for beneficial bacteria that convert harmful ammonia and nitrite into less harmful nitrate.
Many aquarists place additional live rock inside the sump to increase biological filtration without filling the display tank.
Protein Skimmer
A protein skimmer removes dissolved organic waste before it breaks down into ammonia and nitrate. This improves water quality and reduces nutrient buildup.
Choose a skimmer that matches or slightly exceeds your aquarium’s total water volume for the best performance.
Refugium
A refugium is a separate sump chamber designed to support natural filtration. It often contains macroalgae, live rock, and beneficial microorganisms.
Macroalgae absorb excess nitrate and phosphate, while copepods and other tiny organisms reproduce safely before entering the display tank as a natural food source.
Marine Filtration
A complete marine filtration system combines mechanical, biological, and chemical filtration. Filter socks remove debris, live rock supports beneficial bacteria, and activated carbon or specialty media helps remove dissolved impurities when needed.
This multi-stage approach creates stable water conditions that support healthy fish, corals, and invertebrates.
Freshwater Aquarium Sump Setup
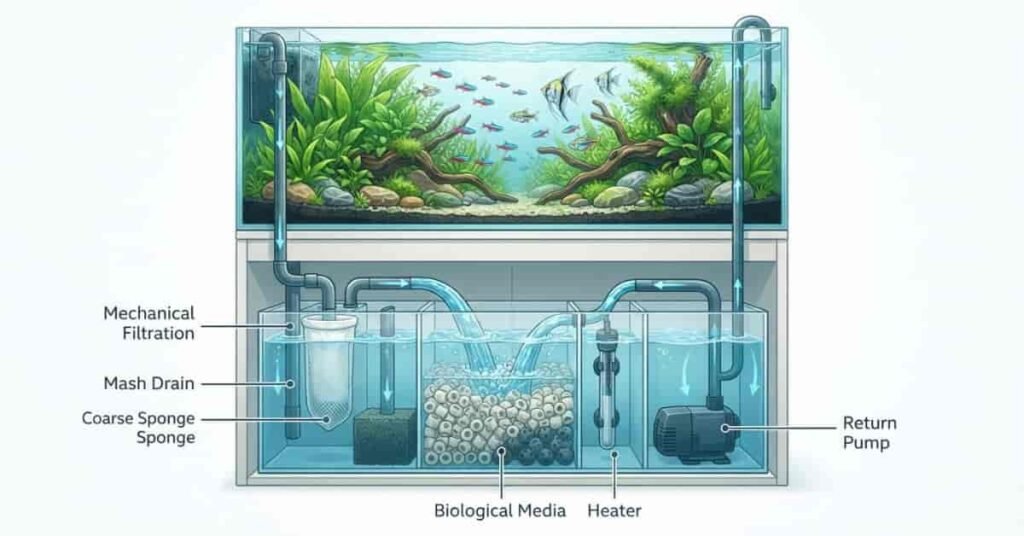
A freshwater aquarium sump setup offers many of the same benefits as a marine sump. It increases water volume, improves filtration, and keeps equipment hidden below the display tank. Although many freshwater aquariums use canister filters, a sump is an excellent option for larger tanks or aquariums with heavy fish populations.
The filtration system can also be customized to match different freshwater aquarium styles.
Biological Filtration
Biological filtration is the heart of every freshwater sump. Beneficial bacteria grow on ceramic rings, bio balls, porous rock, and other filter media. These bacteria convert toxic ammonia into nitrite and then into less harmful nitrate.
Providing plenty of biological media helps maintain stable water quality and supports healthier fish.
Mechanical Filtration
Mechanical filtration removes uneaten food, plant debris, and fish waste before they break down. Filter socks, filter floss, or sponge pads are common choices for the first sump chamber.
Cleaning mechanical media regularly keeps water flowing efficiently and prevents debris from reaching the biological filter.
Planted Tank Considerations
A sump can work very well with planted aquariums. Gentle water circulation distributes nutrients and carbon dioxide more evenly throughout the tank.
Avoid excessive water movement, as some delicate aquatic plants prefer slower flow. Position return nozzles to create circulation without disturbing the substrate.
Cichlid Tanks
Cichlid aquariums produce large amounts of waste, making a sump an excellent filtration choice. The increased biological capacity helps maintain water quality even in heavily stocked tanks.
Strong water circulation and regular maintenance keep the system running efficiently and reduce waste buildup.
Recommended Aquarium Sump Chamber Layout
A well-planned aquarium sump setup improves filtration, keeps equipment organized, and makes maintenance much easier. The order of each chamber is important because every stage prepares the water for the next. Following a logical layout also protects expensive equipment and keeps water flowing efficiently.
Most freshwater and saltwater sump systems use the same basic design. The only difference is that marine aquariums often include a refugium or additional filtration equipment.
Recommended Sump Chamber Layout
| Chamber | Purpose | Recommended Equipment |
|---|---|---|
| 1. Drain Section | Receives water from the display tank | Overflow pipe, filter sock holder |
| 2. Mechanical Filtration | Removes debris and waste | Filter socks, filter floss, sponge pads |
| 3. Biological Media | Supports beneficial bacteria | Ceramic rings, bio balls, porous media |
| 4. Refugium (Optional) | Natural nutrient control | Live rock, macroalgae, refugium light |
| 5. Return Pump Chamber | Pumps clean water back to the aquarium | Return pump, heater, ATO sensor |
How Water Flows Through the Sump
Display Tank → Drain Section → Mechanical Filtration → Biological Media → Refugium (Optional) → Return Pump → Display Tank
This layout removes large debris first, protects beneficial bacteria, and returns clean water to the aquarium.
Key Takeaways
- Keep mechanical filtration first to trap debris.
- Place biological media after mechanical filtration.
- Add a refugium if you have a saltwater or reef aquarium.
- Install the return pump in the final chamber.
- Maintain consistent water levels in the return section.
Best Return Pump Size
Selecting the correct return pump is one of the most important parts of an aquarium sump setup. A pump that is too powerful can overwhelm the overflow, while a pump that is too small reduces filtration efficiency.
The best pump balances flow rate, head height, and turnover rate for your aquarium.
Flow Rate
Flow rate measures how much water the pump moves each hour, usually in GPH (gallons per hour) or LPH (liters per hour).
For most aquariums, the return pump should circulate the display tank 3–5 times per hour through the sump. Higher flow is not always better because other equipment, such as wavemakers or powerheads, often provides additional circulation inside the aquarium.
Head Height
Head height is the vertical distance from the return pump to the outlet inside the display aquarium. As this height increases, the pump delivers less water.
Always check the manufacturer’s flow chart at your actual head height before purchasing a pump.
Turnover Rate
Turnover rate describes how many times the sump filters the aquarium’s total water volume each hour.
General recommendations:
- Freshwater aquariums: 3–5× turnover per hour
- Fish-only saltwater tanks: 4–6× turnover per hour
- Reef aquariums: 5–7× turnover per hour
Return Pump Sizing Guide
| Display Tank Size | Recommended Pump Flow* | Typical Use |
|---|---|---|
| 20 gallons | 80–100 GPH | Freshwater or nano marine |
| 40 gallons | 120–200 GPH | Community aquarium |
| 75 gallons | 225–375 GPH | Freshwater or fish-only marine |
| 125 gallons | 375–625 GPH | Large freshwater or reef |
| 180 gallons | 540–900 GPH | Large reef or marine aquarium |
*Choose the flow after accounting for head height, not the pump’s maximum advertised output.
Common Aquarium Sump Mistakes
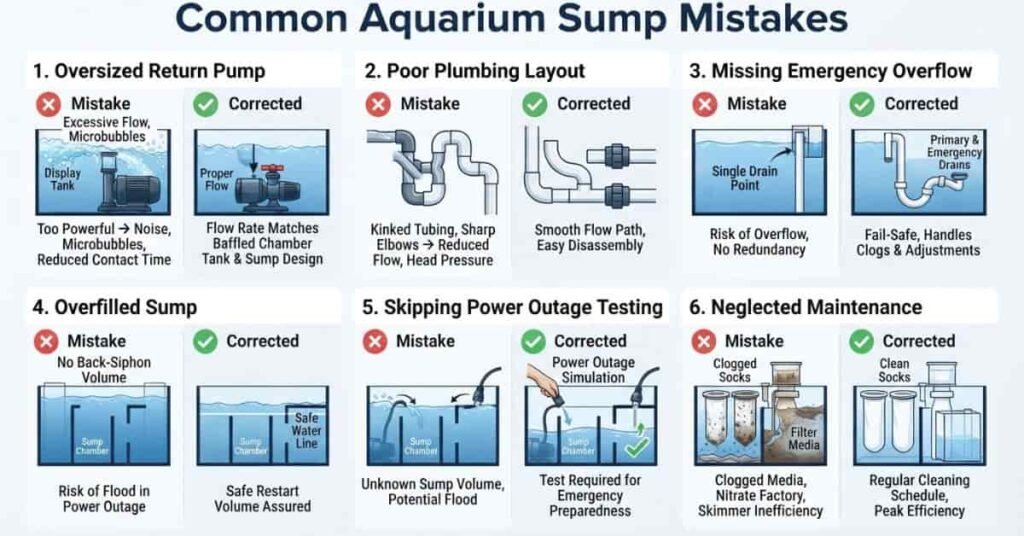
Even the best sump setup for aquarium systems can develop problems if basic installation steps are overlooked. Fortunately, most sump issues are easy to prevent with careful planning and testing.
Learning these common mistakes before setting up your sump can save time, money, and frustration.
Wrong Pump Size
Many beginners buy the largest pump they can find. An oversized pump can overwhelm the overflow, create excessive noise, and waste electricity.
Always match the return pump to both your overflow capacity and desired turnover rate.
Poor Plumbing
Loose fittings, sharp pipe bends, or unsupported plumbing can reduce water flow and increase leak risks.
Use quality PVC fittings, support long pipe sections, and leak-test every connection before adding livestock.
No Emergency Overflow
An emergency overflow provides a backup drain if the primary drain becomes blocked.
Without one, a clogged drain could cause the display aquarium to overflow.
Running the Sump Too Full
Leave enough empty space inside the sump to hold water that drains from the display tank during a power outage.
Filling the sump to the top increases the risk of flooding.
Not Testing Power Outage Scenarios
Before adding fish, turn off the return pump and watch the water level carefully.
The sump should safely contain all draining water and restart normally when power returns.
Skipping Maintenance
Dirty filter socks, clogged pumps, and neglected plumbing reduce water flow and filtration efficiency.
A simple maintenance routine keeps the sump operating quietly and reliably.
Conclusion
A well-planned aquarium sump setup can transform your aquarium by improving filtration, increasing water volume, and creating more stable water conditions. You’ve learned how to choose the right equipment, install a sump step by step, avoid common mistakes, and keep the system running with regular maintenance. Whether you’re building a saltwater aquarium sump setup or a freshwater system, careful planning and testing will give you the best results.
Before adding fish or corals, test the entire system to confirm everything works safely. A little extra time now can prevent costly problems later. With proper care, your sump will provide reliable filtration for many years.
If you found this guide helpful, share it with other aquarium hobbyists and leave a comment below with your sump setup experience or questions. Explore our other aquarium guides to continue building a healthy, thriving tank.
Frequently Asked Questions
Is a sump better than a canister filter?
Can I use a sump on a freshwater aquarium?
What size sump do I need?
How often should I clean my sump?
Can a sump overflow?
Do I need a protein skimmer?
What’s the ideal sump flow rate?
How do I reduce sump noise?
Can I build my own aquarium sump?
Should I test my sump before adding fish?

The Aquarium Advisor Team was founded by Daniel Carter (Austin, Texas, USA) and Emily Parker (Tampa, Florida, USA), two passionate aquarium enthusiasts dedicated to helping hobbyists build healthy and thriving aquariums.
They created AquariumAdvisor.com to share practical aquarium guides and professional online calculators. Every calculator is developed with experienced software developers to ensure accurate, reliable, and easy-to-use results for aquarium owners of all experience levels.